Thirty-odd years later, the A380 – the widest commercial airliner available today with seating for 525 passengers – will be entering into service. It is another testament to Airbus’ commitment to innovation and intelligent design. Therefore, Airbus came to Brüel & Kjær for the development of a transducer they could invariably use to measure sound pressure in limited spaces during flight-testing and where flush mounting of conventional microphone/preamplifier combinations would be impossible or cause undesired side effects.
After multiple prototypes, all of which were rigorously tested by Airbus, the Surface Microphone Type 4948 was born – a flat, small, robust, accurate and stable microphone designed especially for aerospace applications and usable up to 165 dB. Verification trials proved that the microphone could withstand all the requirements demanded of transducers mounted outside an aircraft during flight, including but not limited to de-icing detergent, turbulence, hailstorms, rain, high g levels, a temperature range from –50˚C to 100˚C, cruising altitudes of 30 000 feet, and mach 0.8.
True to their commitment, Airbus continues to utilise the surface microphone in their flight-testing programme – years after its development.
Flying the Design
Flight-testing takes place at Airbus’ Toulouse testing site. It is here the company’s various research and design labs submit prototypes to validate aircraft design and performance characteristics. The individual design teams decide the test criteria, including where to place test sensors. The test engineers at Toulouse then determine the test methods and parameters as well as the types of sensors to be used.
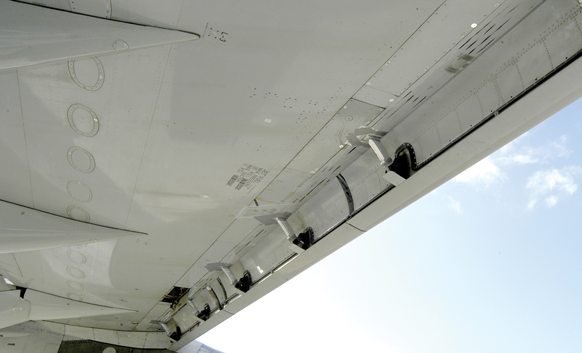
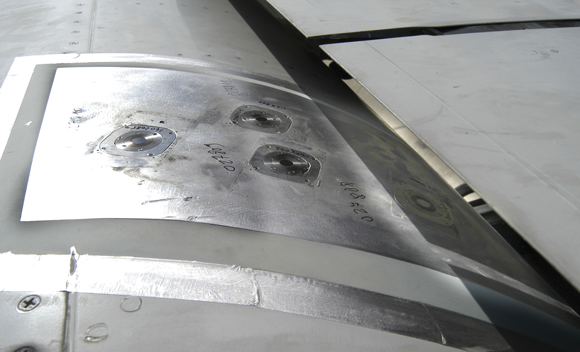
 Above and below: Surface microphones mounted on an Airbus wing for flight testing
To monitor thousands of design parameters Airbus has over 15 000 transducers of different types: acoustic, vibration etc. Their acoustic transducers are used for various applications, including interior noise and exterior noise. For the approximately 200 surface microphones on hand, their robustness, dynamic range and mounting flexibility make them especially suited for acoustic fatigue analysis.
Acoustic fatigue analysis investigates a component’s material properties for weaknesses under acoustic stress. Results help designers choose suitable materials and help determine the lifecycle of individual components to ensure aircraft safety. There is always one model per aircraft family at the Toulouse site to perform regular acoustic fatigue tests.
Test Setup
To test for acoustic fatigue, surface microphones are mounted on the surface of the structure, including locations that were previously considered impossible due to shape, accessibility or safety issues. Even fuel tanks and other sensitive component surfaces can be measured without endangering personnel or risking the loss of the component, as microphone mounting requires no drilling. For curved surfaces like a leading edge, engineers insert the microphone into a customised ‘glove’ that conforms to the curved shape, and then mount the ‘glove’ using an industrial adhesive. With the A380 model, at least 60 surface microphones are mounted on its exterior during acoustic fatigue tests. The ultra-flat design of the microphone and aerodynamic mounting minimises the influence on airflow and thus the measurement.
Cables are held in place with metallic tape and connected to a data recorder or other data acquisition device, The plane is then flown, at times to its maximum altitude (40 000 ft.) where air temperatures can be down to –55˚C. During a flight, noise level measurements are taken based on the sound pressure on the structure’s surface. When relevant, reference measurements are also taken in the interior for comparison. Data is either recorded for later examination or processed in real-time using telemetry. The typical noise frequency is around 6 kHz.
If measurements are required within the aircraft, for example, within the cockpit, test configurations can easily be altered in-flight and new measurements made without landing, thus saving time – for some tests, up to several weeks’ work. A team outside of the test lab handles the actual data analysis, investigating, for the most part, peaks in the measurement.
Accuracy and Quality
To ensure the accuracy of measurements, all surface microphones are calibrated for sensitivity and frequency response in the lab prior to mounting, and then checked with a pistonphone once mounted. After flight-testing, the microphones are returned to the lab for an additional calibration check. This routine provides the test engineers with a verification of the measurements’ accuracy and minimises the cost of errors due to faulty or inaccurate measurements.
From the start, Airbus’ decisions in design, testing and sound and vibration solutions are always taken in consideration of customer satisfaction, as well as market and company expectations.


